[Code Review] VAE code implementation
![[Code Review] VAE code implementation](/content/images/size/w1200/2024/07/-----2024-07-17-100922.png)
 eric98040
본 글은 VAE(Variational AutoEncoder)의 MNIST Dataset에 대한 pytorch code 구현을 상세하게 설명한 페이지다.
전체 코드에 대한 설명이 필요하다면 위의 Github를 참고하면 된다.
1. Model
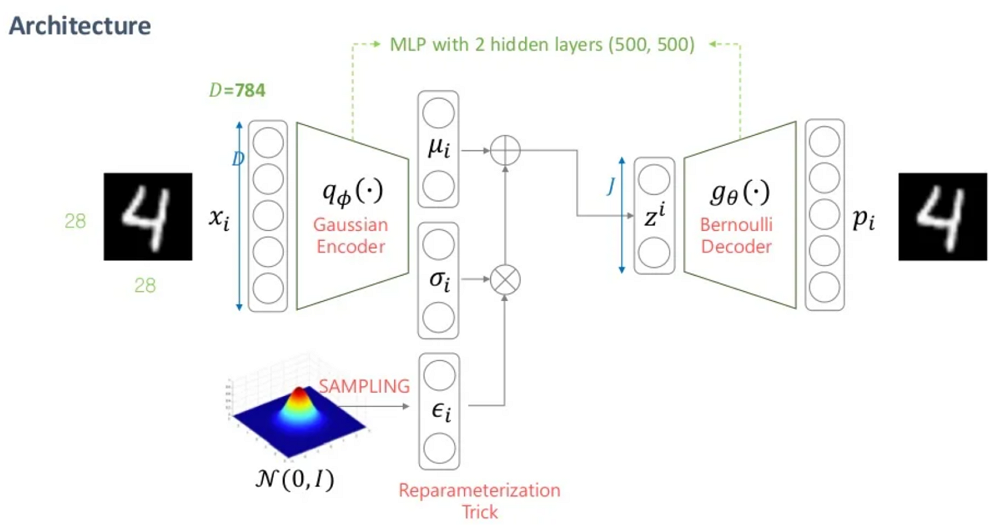
위의 그림과 같이 VAE Architecture는 Gaussian Encoder와 Bernoulli Decoder 2개로 구현되어 있다.
Input Dimension을 $D$, Latent Dimension을 $J$라고 할 때,
Encoder는 Input Dimension을 Latent Dimension으로 차원축소 하고,
Decoder는 Latent Dimension에서 본래의 Input Dimension으로 복원한다.
1) Gaussian Encoder
Encoder는 Input Dimension $D$에서 Latent Dimension $J$로 압축하는 역할을 한다.
class Encoder(nn.Module):
    def __init__(self, input_dim, latent_dim):
        super(Encoder, self).__init__()

        def block(in_dim, out_dim):
            return nn.Sequential(
                nn.Linear(in_dim, out_dim), nn.LayerNorm(out_dim), nn.LeakyReLU(0.2)
            )

        self.downlayers = nn.Sequential(
            *block(input_dim, latent_dim * 2),
            *block(latent_dim * 2, latent_dim * 2),
        )

        self.mean = nn.Linear(latent_dim * 2, latent_dim)
        self.logvar = nn.Linear(latent_dim * 2, latent_dim)

    def forward(self, x):
        mean = self.mean(self.downlayers(x))
        logvar = self.logvar(self.downlayers(x))

        return mean, logvar
Gaussian Encoder는 다음과 같이 3개의 Layer(Norm, Activation 제외) 로 구성되어 있다.
- 1) Input Layer
- Linear Layer(input_dim, latent_dim * 2)
- 2) Hidden Layer
- Linear Layer(latent_dim * 2, latent_dim * 2)
- 3) Output Layer: $\mu, \sigma$
- Linear Layer(latent_dim * 2, latent_dim)
2) Bernoulli Decoder
Decoder는 Latent Dimension $J$에서 Input Dimension $D$으로 복원하는 역할을 한다.
class Decoder(nn.Module):
    def __init__(self, latent_dim, output_dim):
        super(Decoder, self).__init__()

        def block(in_dim, out_dim):
            return nn.Sequential(
                nn.Linear(in_dim, out_dim),
                nn.LayerNorm(out_dim),
                nn.LeakyReLU(0.2),
            )

        self.uplayers = nn.Sequential(
            *block(latent_dim, latent_dim * 2),
            *block(latent_dim * 2, latent_dim * 2),
        )

        self.reconstruction = nn.Linear(latent_dim * 2, output_dim)

    def forward(self, x):
        x = self.uplayers(x)
        x = self.reconstruction(x)
        x_hat = torch.sigmoid(x)
        return x_hat
Bernoulli Decoder는 다음과 같이 3개의 Layer(Norm, Activation 제외) 로 구성되어 있다.
- 1) Input Layer
- Linear Layer(latent_dim, latent_dim * 2)
- 2) Hidden Layer
- Linear Layer(latent_dim * 2, latent_dim * 2)
- 3) Output Layer: Sigmoid
- Linear Layer(latent_dim * 2, output_dim)
- 다만, Decoder의 특성상 기존의 input_dim으로 복원해야 하므로 output_dim = input_dim으로 처리한다.
3) Reparameterize Trick
Re-parameterize Trick을 사용하기 위해 아래의 function을 정의한다.
- $z = \mu + \varepsilon \odot \sigma$
- $\mu, \sigma, \varepsilon$: numpy의 ndarray가 아닌 pytorch의 tensor 형태로 정의한다.
- Data, Model이 아닌 Model에서 사용하는 추가적인 Module이나 Loss Function의경우 ndarray 후 .to(device)대신 처음부터 tensor를 사용한다.
def reparameterize(mean, logvar):
    eps = torch.randn_like(mean)
    std = torch.exp(logvar / 2)
    z = mean + std * eps
    return z
4) VAE Model
따라서 최종적인 VAE Model은 다음과 같이 구성 가능하다.
class VAE(nn.Module):
    def __init__(self, encoder, decoder):
        super(VAE, self).__init__()
        self.Encoder = encoder
        self.Decoder = decoder

    def forward(self, x):
        mean, logvar = self.Encoder(x)
        z = reparameterize(mean, logvar)
        x_hat = self.Decoder(z)
        return x_hat, mean, logvar
주의할 점은 Loss Function에 Decoder의 output인 $\hat{x}$ 뿐 아니라
Encoder의 output인 $\log (\sigma^{2}), \mu$도 들어가므로 VAE Model Class의 Output을 $\hat{x}, \log (\sigma^{2}), \mu$의 3개로 처리해야 한다.
2. Utils
VAE Model에서 사용하는 Dataset이나 Image Visualization의 경우 아래와 같이 작성할 수 있다.
import torch
import torchvision.transforms as transforms
from torch.utils.data import DataLoader
from torchvision.datasets import MNIST
import numpy as np
import matplotlib.pyplot as plt


def preprocess_data(batch_size):
    mnist_transform = transforms.Compose([transforms.ToTensor()])

    kwargs = {"num_workers": 1, "pin_memory": True} if torch.cuda.is_available() else {}

    train_dataset = MNIST(
        root="./data", train=True, download=True, transform=mnist_transform
    )
    test_dataset = MNIST(
        root="./data", train=False, download=True, transform=mnist_transform
    )

    train_loader = DataLoader(
        train_dataset, batch_size=batch_size, shuffle=True, **kwargs
    )
    test_loader = DataLoader(
        test_dataset, batch_size=batch_size, shuffle=False, **kwargs
    )

    return train_loader, test_loader


def show_image(x, x_hat):
    fig, (ax1, ax2) = plt.subplots(1, 2)
    ax1.imshow(np.array(x[0][0]), cmap="gray")
    ax1.set_title("Original Image")
    ax1.axis("off")
    ax2.imshow(x_hat[0][0], cmap="gray")
    ax2.set_title("Reconstructed Image")
    ax2.axis("off")
    plt.show()
3. Train, Evaluate
train.py와 evaluate.py의 경우 해당 Module에서 직접 실행시켰을 때만 작동하도록 if __name__ == '__main__': 를 이용하여 안에 main() 함수를 사용한다.
if __name__ == '__main__':처럼__name__변수의 값이__main__인지 확인하는 코드는 현재 스크립트 파일이 프로그램의 시작점이 맞는지 판단하는 작업이다.
즉, 스크립트 파일이 메인 프로그램으로 사용될 때와 모듈로 사용될 때를 구분하기 위한 용도이다.
쉽게 생각하면 모듈에if __name__=='__main__'이라는 조건문을 넣어주고 그 아래는 직접 실행시켰을 때만 실행되길 원하는 코드들을 넣어주는 것으로 생각하면 쉬울 것이다.
그리고 Python Decorator를 사용하여 train_epoch함수와 evaluate_model 함수를 정의하여 재사용할 수 있도록 설정했다. (사실 굳이 필요한가 싶다)
Decorator의 간단한 사용법은 아래와 같다.
# decorator를 정의하는 함수. 인자로 함수를 받습니다.
def my_decorator(func):
    def wrapper():
        print("함수 실행 전 무언가를 합니다..")
        func() # 인자로 받은 함수를 실행합니다.
        print("함수 실행 후 무언가를 합니다.")
    return wrapper

# @ + decorator 함수명을 앞에 쓰는 사용할 수 있습니다.
@my_decorator
def say_hello():
    print("Hello!")

say_hello()
기존의 코드를 유지하면서 확장성을 더하는 작업인데, 일종의 함수 빼돌리기라고 봐도 무방하다.
간단히 말하면 @decorator_func 을 빼돌리고자 하는 real_func( ) 위에 정의하면, 실제 실행 코드는 아래와 같다.
real_func = decorator_func(real_func)즉, 함수를 객체화 했다고 볼 수 있다.
@없이 기존의 함수를 선언했다고 치고, @뒤의 decorator function이 선언된 기존의 함수를 인자로 받아서 함수를 실행하듯이 실행하고, 이를 기존의 함수 이름에 재할당했다고 보면 된다.
train.py의 코드는 아래와 같다.
import torch
import torch.optim as optim
import torch.nn.functional as F
from tqdm import tqdm
from vae.model import Encoder, Decoder, VAE
from vae.utils import preprocess_data


def main():
    # Hyperparameters
    batch_size = 64
    epochs = 30
    input_dim = 28 * 28
    latent_dim = 128
    lr = 1e-3

    device = torch.device("cuda" if torch.cuda.is_available() else "cpu")
    print(f"Using device: {device}")

    # Prepare data
    train_loader, _ = preprocess_data(batch_size)

    # Initialize models
    encoder = Encoder(input_dim, latent_dim).to(device)
    decoder = Decoder(latent_dim, input_dim).to(device)
    model = VAE(encoder, decoder).to(device)

    # Loss function
    def loss_function(x, x_hat, mean, logvar):
        reconstruction_loss = F.binary_cross_entropy(x_hat, x, reduction="sum")
        regularization_loss = 0.5 * torch.sum(logvar.exp() + mean.pow(2) - logvar - 1)
        return reconstruction_loss + regularization_loss

    optimizer = optim.Adam(model.parameters(), lr=lr)

    # Training loop
    print("Start training VAE...")

    @torch.enable_grad()
    def train_epoch(model, train_loader, optimizer, device):
        model.train()
        overall_loss = 0
        for x, _ in tqdm(train_loader, desc="Training", leave=False):
            x = x.view(-1, input_dim).to(device)
            optimizer.zero_grad()
            x_hat, mean, logvar = model(x)
            loss = loss_function(x, x_hat, mean, logvar)
            overall_loss += loss.item()
            loss.backward()
            optimizer.step()
        return overall_loss

    for epoch in range(epochs):
        overall_loss = train_epoch(model, train_loader, optimizer, device)
        print(
            f"Epoch {epoch + 1}/{epochs}, Average Loss: {overall_loss / len(train_loader.dataset):.4f}"
        )

    print("Training finished!")

    # Save model weights
    torch.save(model.state_dict(), "vae_weights.pth")


if __name__ == "__main__":
    # torch.multiprocessing.freeze_support()
    main()
evaluate.py의 코드는 아래와 같다.
import torch
from tqdm import tqdm
from vae.model import Encoder, Decoder, VAE
from vae.utils import preprocess_data, show_image
import matplotlib.pyplot as plt


def main():
    # Hyperparameters
    batch_size = 64
    input_dim = 28 * 28
    latent_dim = 128

    device = torch.device("cuda" if torch.cuda.is_available() else "cpu")
    print(device)

    # Prepare data
    _, test_loader = preprocess_data(batch_size)

    # Initialize models
    encoder = Encoder(input_dim, latent_dim).to(device)
    decoder = Decoder(latent_dim, input_dim).to(device)
    model = VAE(encoder, decoder).to(device)

    # Load model weights
    model.load_state_dict(torch.load("vae_weights.pth"))

    # Evaluate model
    x, x_hat = evaluate_model(model, test_loader, device, input_dim)
    show_image(x, x_hat)

    # Generate image from noise vector
    samples = generate_samples(decoder, latent_dim, batch_size, device)

    plt.figure(figsize=(10, 5))
    plt.subplot(121)
    plt.imshow(samples[32][0], cmap="gray")
    plt.title("Generated Sample 1")
    plt.axis("off")
    plt.subplot(122)
    plt.imshow(samples[23][0], cmap="gray")
    plt.title("Generated Sample 2")
    plt.axis("off")
    plt.show()


@torch.no_grad()
def evaluate_model(model, test_loader, device, input_dim):
    model.eval()
    for idx, (x, _) in enumerate(tqdm(test_loader)):
        x = x.view(-1, input_dim).to(device)
        x_hat, _, _ = model(x)
        if idx == 0:
            break

    x = x.view(-1, 1, 28, 28).cpu().numpy()
    x_hat = x_hat.view(-1, 1, 28, 28).cpu().numpy()
    return x, x_hat


@torch.no_grad()
def generate_samples(decoder, latent_dim, batch_size, device):
    noise = torch.randn(batch_size, latent_dim).to(device)
    samples = decoder(noise).view(-1, 1, 28, 28).cpu().numpy()
    return samples


if __name__ == "__main__":
    # torch.multiprocessing.freeze_support()
    main()
Conclusion
Code Implementation을 하면서 느꼈던 주의할 점들은 다음과 같다.
즉, backpropagation에서는 모든 연산이 tensor 기반으로 되어있어야 한다.
- Dataset이나 Model의 경우
- .to(device)를 통해 cuda device로 옮겨준다.
- Loss Function이나 Model안에 들어가는 Additional Module의 경우
- Backpropagation시 ndarray 기반이면 연산이 불가능
- 1) np.function() 보다는 torch.function( ) 이나 variable.torch_function( ) 형태를 이용
- 2) ndarray 생성 후 .to(device)를 통해 cuda device로 옮겨준다.
일반적으로는 Loss Function에서 사용하는 Term들이 final step의 output이므로 기존 Model Class의 return 값만을 이용하면 된다.
다만, VAE는 Decoder의 output인 $\hat{x}$ 뿐만 아니라 Encoder의 output인 $\mu, \sigma$의 값도 Loss Function의 Term에 들어가기에 필요하다.
즉, 이러한 경우 Model Class가 return하는 값을 $\hat{x}$ 하나만 넣는 것이 아니라, Encoder의 $\mu, \sigma$값을 저장해 놓았다가 3개의 term을 같이 반환하도록 코드를 구성한다.
 samra-irshad
 MngFrc
Binary cross entropy with a non-0/1 target
by u/dingdongkiss in MLQuestions
이에 대한 자세한 설명은 위의 링크에서 확인할 수 있다.

일반적으로 Binary Cross-Entropy Loss는 Target이 Bernoulli Distribution을 따르는 binary value(0 or 1)를 가져야 사용가능하다.
그렇기에 Binary Cross-Entropy Loss는 주로 Binary Classification Task에 사용된다.
다만 0 or 1이 아닌, 0과 1사이의 값을 가지는 [0, 1] interval에 대해서도 nn.BCELoss() 는 적용가능하다.
즉, Library마다 사용하는 Binary Cross-Entropy Loss의 target value가
- 1) between 0 and 1: $0 \leq y \leq 1$
- 2) 0 or 1: $y \in {0, 1}$
둘 중 하나를 만족하게 되어 있다. 다만 Pytorch에서 사용하는 nn.BCELoss 모듈의 경우 0부터 1사이의 probability를 가지는 경우 1)에 대해 사용가능하도록 되어 있다.
즉, PyTorch에서는 임의의 output에 대해 Sigmoid Activation을 적용한 경우 모든 실수에 대해 [0, 1]의 범위로 mapping하므로
Sigmoid를 Acitvation으로 사용한 경우 BCELoss를 loss function으로 사용할 수 있다.

위의 답변을 보면 그 해답을 찾을 수 있다.
일반적으로 Binary - Classification 문제는 class가 0(refused, No) 또는 1(accepted, Yes)이 나오도록 Input을 classify 한다.
다만 Output이 0에서 1사이의 연속적인 값이 나왔을 때는, class 1에 들어갈 확률으로 이해하면 된다.
The key is that the continuous output of the model is to be
understood as the predicted probability of the input being in
class-“1”. And this is exactly whatBCELossexpects.
Pytorch module에서 이와 같이 $[0,1]$의 continuous value로 설정한 이유는 differentiable computation을 수행하고, 이를 differentiable loss function으로 fed하여 back-propagation을 통해 train할 수 있기 때문이다.
![[Paper Review] Image Super-Resolution via Iterative Refinement (SR3)](/content/images/size/w960/2024/09/-----2024-09-10-203649.png)
![[Paper Review] Diffusion Models Beat GANs on Image Synthesis](/content/images/size/w960/2024/07/Screenshot-2024-08-01-at-05.49.39.png)
![[Paper Review] CTAB-GAN: Effective Table Data Synthesizing](/content/images/size/w960/2024/07/Screenshot-2024-07-28-at-07.39.16.png)
![[Paper Review] Denoising Diffusion Implicit Models (DDIM)](/content/images/size/w960/2024/07/-----2024-07-24-174331.png)